New & improved pattern! (Download now from Ravelry)
NEEDLES
16-inch circular needle, size 5 or 6
(Optional: a set of double-pointed needles in the same size)
YARN
This bag is worked in wool worsted-weight yarn — the size most commonly used for sweaters. It takes about 40 yards of the color you use the most, and 10 to 20 yards each of three or more other colors.
Recommended yarns: Bartlett Yarns Fisherman 2-ply, Philosopher’s Wool 2-ply worsted, or another 2-ply 100% wool worsted-weight yarn would be the closest approximation to historical yarn from before 1600. To be most historically accurate you want solid colors, with no light-to-dark or multicolor shading or heathering (these are later developments).
If you use white or cream-colored yarn, it can either be wool, or worsted-weight cotton yarn such as “Sugar’n’Cream”. The earliest knitted pieces often use unbleached cotton as their white.
BEGINNING AT THE TOP
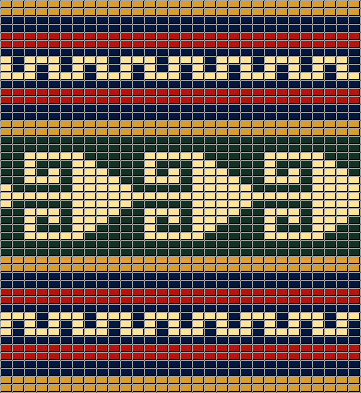
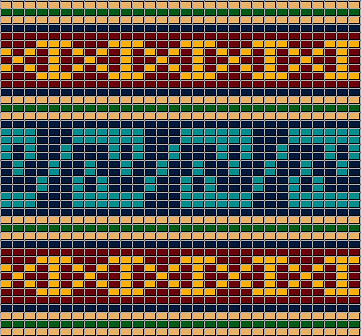
Cast on 72 stitches (for Color chart #1) or 70 stitches (for Color chart #2) with your main color. Join stitches into a round, being careful not to twist the row of stitches when you join it.
Knit plain (knit every stitch — no need to purl). Work about 1/2 to 1 inch before you start the color patterning and the same after you have finished the color-patterned band. 1 square in the color chart equals one stitch.
After an inch or two, you may want to try putting your stitches onto 3 or 4 double-pointed needles, with one needle left free to work the stitches on each needle in turn. This was the method used for knitting in the round before circular needles were invented in the early 20th century.
The key to good color-stranded knitting is tension. The yarn colors that aren’t being used at the moment are carried on the wrong side of the knitting. If these “floats” are too tight, the knitting will pucker and warp. A good rule of thumb is this: before you take the first stitch of a color that has not been used recently, spread the stitches on your right needle as far apart as they will go. Take your new stitch and pull it just barely snug — not tight. When you release the pull on this yarn, the float will be just loose enough.
If, by chance, you get a float too loose, it’s easy to pull on it to adjust the stitches on the front so they don’t gap. With washing, the floats will stick to the inside of the bag and not be troublesome.
Don’t tie knots when you change colors; instead, just start knitting with the new yarn. The stitches will be loose at first, but you can go back and tighten them when you have knitted half a round or so. If you will use a color again within two or three rounds, leave it hanging on the inside of the bag; otherwise, leave about six to eight inches hanging and cut the yarn.
When you have worked the color patterning and another 1/2 to 1 inch in your main color, bind off.
FINISHING
Flatten the cylinder of knitting and overcast (sew) the two bound-off edges together at the bottom with a large needle and a strand of the same yarn (going once through each front & back stitch).
Alternatively, instead of a normal bind-off, do a 3-needle bind-off to close the bottom of the bag (a common finish for closed ends before 1600).
Where you changed colors, pull the beginning and ending of the colored yarn carefully so the stitches on the outside are the same size as all the other stitches. Take the loose end of yarn and, on the inside of the bag, weave it in and out a few times among other stitches of the same color and trim off the end.
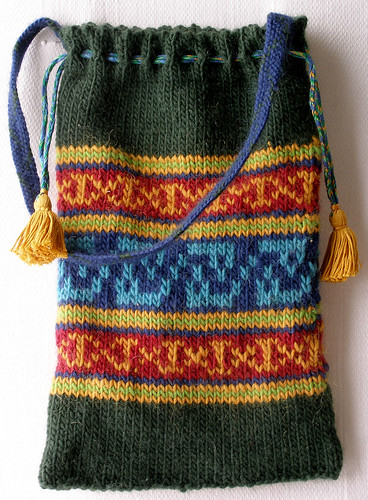
Braid a carrying strap from leftover yarn (or any yarn you like). Sew it neatly onto the top of the bag at two opposite points. Cut or make two drawstrings — they work better if they are not wool. Shoelaces, smooth cotton string, and braided cotton embroidery thread work well. Thread both drawstrings in and out between the stitches in the third row from the top of the bag. Knot the two ends of each drawstring together. Pull one drawstring from each side to close the bag.
Simple bags like this often show up in medieval paintings with three to five tassels along the bottom.
HISTORICAL BACKGROUND
For more information about the historical background of this bag, download the pattern now.
Text, page and photo copyright 2012 by Chris Laning. This pattern may be reproduced for nonprofit educational uses only; copies must include this notice. See the Creative Commons license icon in the right column for details. Please contact the author with any questions.
Charts
(click for larger versions)

3 comments:
I loved both of these little bags. Thank you so much for sharing.
excelente trabalho!!!
How did you tack down your twisted braid on the hearts bag please?
Post a Comment